Tuesday, 17 December 2013

Proposal for 3D Modelling


Working title
Modelling Advertising products

Format
For my 3D modelling unit I’m going produce a new application for advertising and marketing. I have chosen to do this area because is a variety of things I could make; I particularly want to make gym layout structure model for a new gym that is opening in my area.

Specification
My target audience is going to be aimed at adults aged 18- 30 years old. This is because people who go to the gym want to get fit and healthy, I am going to be thinking about the layout carefully and how the layout is going to be structured. The colours are going to be different colours to make it more comfortable for the customers. The atmosphere is a simple and clean. The lighting is going to be fixed but the room is going to be bright.

My product will be used show a gym layout structure of what the buyer wants the layout to be like. so  high resolution and must have textures to make them realistic. Because the products will be on a bill board to show the public the new gym layout and to show the owner.

Legal and ethical considerations
I won’t need to worry about the commissioning bodies because they are more for games and TV shows and about age range of the games. What I will have to consider is the copy right law, even though I wont copy someone, they may feel like my gym idea  is similar to there’s because you have similar things in the gym.

Models
The models I’m going to be making are going to be an gym but are going to be shown as a gym layout structure to the owner. I’m going to  be making a running machine, an exercise bike, a  multi gym, a weight bench, a rowing machine, a file tray, a water cooler and a weight storage . Then there is going to be the things that you normally see in a room as well to make it look more realisic.

Thursday, 12 December 2013

3D modelling- How to make a tap

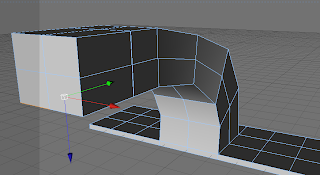
Firstly I started off by a square I did this by going on objects and then primitives and pressing on a square, I had to change the cube's size so that the width is 1000m and the segment is 8, the height is 20m and the segment at 1 and the depth at 300m and and the segment being 3. I then had to switch to polygon mode by going on tools and going on polygons, and went on live mode and clicked on the 4 middle slates. I then went to the extrude tool by going on structures, and putting 150m in the off put field. I then went onto the co-ordinates manager and put 30 in the p which is under rotation.

I then went back on the active tool and did the same again, by going on extrude and  putting 150m in the off put field. I then going onto the co-ordinates manager and put 30 in the p which is under rotation.

I then did this again but instead of putting 30 in the p which is in rotation, i put in 20.  I found this part quite hard because it kept separating in the middle so I had to restart it again, because I forgot to press the extrusion on one of the parts. I then went on normal scale which was in structure and scaled the polygons down to 50%.

I then switched it back to extrude tool and extrude it by 200m on the offset . I then rotated it again by 10% which again was put under p under rotation in the coordinates manager. I then extrude it again 100m and then again 150m. 


I then had to select the 2 bottom polygons and extruded these 100m. I then went on structure and went on extrude inner tool and input 30m in the offset and then went on the extrude tool and put in the offset field -150m

I then put a hyper nurbs, by going on objects and going on nurbs and dragging it on the cube which it then should look like this. 

For the nobs of the sick I then had to hide the tap which by clicking on the top grey dot on the right of the object manager until it turns red.

I then had to go back on polygon mode and clicked the side faces and then went on extrude and put them at 150m 

I then switched to normal scale tool which is on structures and then scaled them down to 50%. Then went back on the extrude tool to 50m, Then switched back to normal scale tool and input 200 percent in the active tool dialog 

I then extruded the polygons again by 200m and selected the top middle polygon and extruded that to 10m. 

Then I clicked on the show button so it showed the top of the tap and moved the tap handle, were I moved it across 400cm.   

I then made the tap like 


I then put the marble 9

Tuesday, 10 December 2013

Applications on 3D Modelling - Film and TV

3D modelling in films and TV was first used in the film Jurassic Park, mostly all the dinosaurs in the film was done on 3D CGI as well as the live action in the film. By doing the film in this way it takes time. In Jurassic Park they would of used a lot of green screen to make the film come to life. But that was back in the 1990's when we were only just developing the 3D animation films and making cereal films.

Today we do 3D modelling by pre digital composing technique. This is were there is a specific colour that has been took and the colour is normally green or blue, hence green screen. What happens is the software is designed to pick out the colour that is selected and you can change the colour into an image. For example on the news the weather person will stand in front of a blue or green screen, and the green background will be replaced with a weather map to the viewers.

3D development software

There are a lot of 3D application and it's getting more and more popular. You can buy a 3D animation package that has a really good toolkit which you can hook up to your computer. There is a lot of tool kits out there what people use for making 3D games, such as softimage, 3D max and Maya. 

Maya
Maya is a 3D computer graphic software that runs on Microsoft so you can use it on your laptop. This is used for so many applications it for example video games, animated films. This is one of the most popular used 3D applications

Cinema4D 
 Cinema 4D is a 3D modelling application which lets you make your 2D images come to life, you can do so much on this application as you can see on my blog because this is what we are using. It gives you a visual look at what your object will look like. It has been developed by MAXON and because they have took it over, it has now been developed so much more. You are now able to use so many tools such as rendering, lighting the object to make it look more realistic, animating and so much more. Cinema 4D has been out since the 1990 and was used on Amiga computers, but now MAXON has took it over they have reached a wider audience and is so much better to use.

ZBrush
The ZBrush is a most used for digital sculpting, it's used in movies games and animations. In this application it is known for it's medium and high frequency sculpturing. A lot of modelling agencies use this application. It uses a 'pixol' technology which stores lighting, colour and materials . Most model agencies use the ZBrush so that they can make changes to their models.

3D Studio Max
This application is mostly used for doing architecture and making your plans come to life, As well as architectures who use this, many game developers use it as well, because it's really flexible and you can do so much on it.Which is what game developers want, because on this applicant you can make your own scripting language, can make global illumination, make your own maps ect. This applicant can be used on Microsoft windows computer.


How To Make A Wine Glass On Cinema 4D

Firstly I had to get an image, I did this by going on the all view button on the side, and going on the edit button and went down to the configure, and went to the attributes  and clicked on the viewport and clicked on the back button as you can see I went to images and got an image of wine glass.

I then had to go on the spline object and click in on the Belize tool. I then did a point in the middle of the wine glass and clicked and dragged it. I clicked on another point at the top and curved it around which was quite tricky to do and took me a couple of attempts to get it right.
I then pressed on the live action tool button and went the rest of the way around. I then had to press the shift button to get in stem of the wine glass right I used the shift tool so that it kept the first point at the same size but I can move the other one freely. Once that was done I smoothed it out and clicked on the all view button and clicked on the perspective view.

Once I got it on the perspective view I clicked on the HyperNURBS and clicked on the Lathe NURBS tool, and it ended like this. which I thought looks like a wine glass.

to get it like this I went on content browser and clicked on cinema4D and then on add ons and then on materials and clicked on basic and went on glass 4. And clicked don the glass. I then went back to materials and went on fabric challenge and picked a fabric.


Monday, 9 December 2013

Modelling a Pillar in cinema 4D

I first had to make a cube I did this by clicking on the cube object and pressed on cube this is what it came up on. You have to have a base for anything and by clicking on a shape in the shape object you can create anything from a simple shape.
I then went on the side option and wet on object properties and changed the sizes to 200m, 45m, 200m. I then  pressed on the fillet button and made the radius 4m, and then did the subdivision.
After I did the object properties it then looked like this I then duplicated the cube and changed the name so I knew which cube it was. I then changed the object properties on that cube to 150m, 45m, 150m and the fillet the same. I then got the move tool and went along the y axis to make it like the base of the pillar as you can see below. 


I then had to get a cogwheel. I did this by going on the free hand spline and then going to the plane which is in a box at the size were i went on object properties before and laid the image flat by pressing the xz on the plane option.I then had to change the object properties, the teeth was put to 20, inner radius 57m, middle radius 58m, outer radius 60m. I then needed to stretch the cogwheel. I did this by going on the hyer nurbs object and going on the extrude nurb button.

To finish it off I copied and pasted the 2 boxes that I made at the start I then dragged the 2 boxes up on the y axis u til it got to the top of the pillar, I then added a  marble colour on the pillars and put a light on it as you can see and also a sky.

This is a what it looked like when I rendered it.


Friday, 6 December 2013

Applications of 3D modelling - games


3D is found in many games now, from the Xbox 360 to the ps4, the world is moving at a fast past and now time has changed. It use to be 2d on the gamboys now you can use an Xbox connect which puts you in the game. Which is incredible.

You can create a 3D effects, now over 94 percent of games are done with 3D modelling. The tools that they use in 3D games are really advanced.  You can use a software tool called Granny which is built to plug into your exporter in your computer or laptop.

The 3D monster Maze was the first ever game that was done on a 3D  games machine. as you can see it's really simple and the game randomly generated a maze as you ran around it. You got points for how many steps you get away from the t-rex. As you can tell from the games today, this game is very simple and the games of today are really advanced.


Thursday, 5 December 2013

what the buttons are used for in cinema 4d


This is the bar tool which has most of the thing you need for cinema 4D.


The first 2 buttons buttons are used for undoing and redoing your work. This button was really helpful when I was doing my robot because I didn't know what buttons I was using I could go back and restart again, or go forward when I thought it looked alright.

The pink button next to the yellow buttons is used to click on individual edges and to move them or edit them to make the shape perfect for you to move or if you want to select your points. I used this tool a little bit for when I was doing the finishing touches to my robot.

The 3 turquoise colours next to the pink button are for moving rotating and scaling to size the object. These are used all the time are are one of the most used buttons on cinema 4D. They are really easy to use. I used them a lot when I was doing my robot, I had to scale the squares so they looked liked robot hands and legs ect. And also rotating the arm so that it came out from the robot.

By clicking on any of the 3 red buttons you lock or unlock the x,y, and z axis so that your object stays the same and can only limit your self to a certain direction you can go to. These buttons are used but mainly on more advanced software and animation because most people just use the x,y, and z arrow keys to move the object.

The next button is purple and this lets you switch from use world and the object co-ordination system. It lets you see where the object will be. For example if you locked the x and y axis and moved the object it will go on the x axis.

The green buttons are render active view button which lets you see the object as how it would look. This is a really useful tool because it is like a preview button to let you see what it would look finished. It just basically used for checking the scene in the active view.

The blue button is for searching and getting shapes, this button has so many shapes and is the main structure for any creation on cinema 4D. after you have choosen your shape you then have converted the shape to polygon objects by using the first button on the left hand bar, this allows you to edit your shape to whatever you want it to be.

The yellow button is called the spline button, what this button does is it is the line tool and you can make arches and circular shapes this is a very useful tool when you want to make something a bit more complex.

The dark orange tool is called the  HyperNURBS object this is one of the most important tools that you can use as well as useful. The reason for this is because it smoothens out the edges and makes the objects automatically look rounder and smoother. you can then pull points out and make it into whatever shape you want because it's really easy to play with.


How To Make A Robot On Cinema 4D

First I started off by going on the blue cube on the bar, which brought up a box like this. I then had to scale it by going on the 5th button across and scaling it to size to make the body. I then added another box and used the same process. I had to use the editing button so that I could move them about to the right position. I picked it up quite easily it was hard at first but once I got use to the buttons it was alright to use the basics. 
This is my robot nearly finished, I had to use the all round camera which shows every angle of the x,y and z axis , this was really useful because I could then make my robot come together and make this. Once I got the base of the robot I then had to start doing the eyes and mouth. I did this by copy and pasting the square of the head and scaling it to size.

This was when I finished doing the eyes and, I was rotating it by pressing the rotation button to make it to the angle I wanted it at. I then went back on the all view screen, so that I could see if it looked right.

I then pressed content browser which is on the bar above, it then came up with a load of options, scroll down to materials and then onto anisotropic and pressed on radius 5. This radius is like a metal shape, and looks really good for robots.

With this I then went back on the browser and went on marble 3 which looked really nice for the floor, but first I had to put a light on it by pressing on the light object on the bar tool and pressing on the sun light button. I then changed the angle of the man so he was facing away from the camera.
This is what my robot looked like before I rendered it. You can see the marble floor and the robot facing away it really looks like it coming together. 


I then added another robot by grouping the robot together and copy and pasted it and moved the robot, so that it looks like they are going to shake hands. I then put a shadow on them to give it a bit more realism to the lighting.
 
This is what my robots look like when I have rendered them as you can see the shadow on the marble floor and from the image above to this one it looks really different,