Thursday 27 March 2014

Summary Of My Models


From the original Images I copied off, I thought my models that I did in cinema 4D was very much alike and was pleased at what I achieved.  In the summary i'm going to be talking, how I compared the original image, How Effective The Models Are, How Complex They Are and How I Could Improve The Models.

Comparing my cinema 4d towards the original image I think it looks really good.  I don't think it's as detailed although I have tried to make it as detailed as possible. I have done my own spin on the bike and made it more modern because that is what I was going make my gym like. What are similar with the original product is the bike wheels and the seat and the body frame. I think my model of my bike is more colourful but more simpler it's more thicker than the original image, but they are still very similar. I think for one of my first models this was really good considering I was only getting use to the software. What I did similar as well is the handle bars and the screen.

I think the bike is an effective model because you can tell what it does. It's effective because the product works. It will be cheaper than the original. Because the bike is bigger and larger in size it will hold a bigger capacity which appeals to a larger audience. This is going to be a more effective model than the original image because it going to be cheaper in the production cost.

This model of the bike was hard to make because of the body and the extrude tool. When I was doing the bike I didn't know how hard it was. I did have a couple of issues with the bike as you can see when I discussed my problems on my previous blogger. The hardest part of the bike was the body because It was quite tricky doing the size and the width of the bike.

If I was to improve the bike and do it again I would make the legs so that they look more like the other equipment with the legs. So that they don't so much look like seal legs. Also If I was to improve the model I would add more detail like were the water bottle is suppose to go. Maybe make my own logo on the side, I would do this so that it looks more unique and more my own design.  But I have tried my hardest with this model, I think this was one of the hardest models to make.

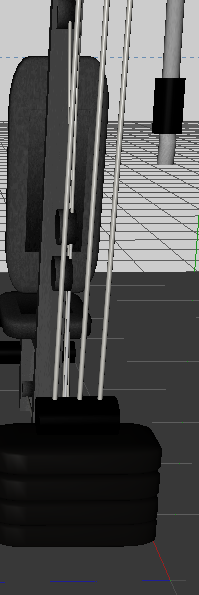
Comparing my 3D model to the model I tried to copy off, I think it looks very similar. Although it was very complex to do. I think it looks very simpler. With the foot press and the weight pulling. I have tried to copy most of the items like the style and the layout because I thought it looks really unique and looks effective. What is different to the original image is the amount of wire that goes around the 3d model to make the weights look more heavy.  What I haven't done is put as much detail in as in the original image the reason for this is because I didn't feel like it needed it like for example the bar at the top and the bar at the bottom. I think my 3D model is near enough like the original image. I have tried to get the texture also a lot like it unlike my other photos because I thought it would look more classier and be the main focus of the gym because of how big the object is.

I think my multi gym is effective, the reason for this is because it looks really similar to the original image so that the consumer will be able to know what they are buying and the amount of space it is going to take up. Even though the multi gym is going to take up quite a lot of room, it will bring more of the audience in, especially the men. With this model as well it would be cheaper to buy because it is an off set of the original product, and it doesn't have a make. The reason why I haven't put a make into my products is because I didn't feel like they needed them. because it's a walkthrough your more focused on the layout and the positioning of the equipment rather than the make, this lends to come afterwards unless the customer says otherwise.

This model was quite hard to make but not as hard as the bike model the reason for this was because there was some complexivity with the seats and handle bars. But with the other things it was mainly just putting it together and making sure the sizes were right. Even though it does look complicated and big the only difficulty I had with this product was the arch on the back that holds everything together. I found this was the hardest because  I didn't know what tool to use so I had to have a look on youtube. But eventually I found there were more ways than one and used the bridge tool to make the clean cut on the semi circle and kept extruding it.

If I was to improve my multi gym I would maybe put more detail into the weights and put a light on them so that you can see the colour more instead of it looking like a block. I did do them individually but I would of liked it if you could see the more detail I put into them. Also if I had more time I would add logos and other things onto it just to make it that bit better even though I don't feel like it needs it. I would also look more closely at the texture I've used and make amendments on that so that it looks more like one. 
As you can see from my 3D modelling that they are not that much similar the reason for this is because I didn't like the original shape. I didn't do the holes in the file because I didn't think it was necessary. From my 3D file I have changed the colour and i've added paper to the file to make it more realistic. What I have kept the same is the amount of how many shelfs it is.

I think my file is quite effective because it looks realistic and it brings the gym more to life as well. The reason why I did a file is because I wanted to make the gym more lifelike., when the customer is looking at it. What I have found is that when architectures do a walkthrough they tend to build the space up to make the room look like it's real. And I think when I added bits like the file and my cups and chairs ect it makes it feel more real.

This was one of my easier models to make because it wasn't that hard, this isn't one of my main 6 models. How I did this was simply just got a box and took out the top face and the front face. And narrowed it down. The hardest bit I had trouble with was the narrowing it down the reason for this was because I tried to extrude it and it didn't work because it was only extruding the lines not the edges, but finally I did it to make it thinner. Also because it was my first time at adding an image( the paper) i had to figure out how I get an image onto the object, this was easy to do once i got the hang of it though.

If I was to improve the model I would make sure the paper was the right way up which I didn't notice until I did it. But it's something you can't really tell. Also I maybe would put a bit more detail into it rather than doing it basic.
Comparing the rowing machine with the original image I think they look very similar. Even though I have tried to go near as damit to the original image. I have put a screen  cover onto the screen to make it look more realistic. I have tried to make the shape of the body look very similar as well. The only thing that is different is the fan bit which I have done my own fan style. To make it look a little different.

I think my rowing machine is really effective because it looks like one and I know that it looks like a rowing machine so when I do a walkthrough the customer will know what the object is and were it is going to go. I think this is a more detailed object and has a lot more complex shapes with it.

This was one of the harder models because of the the body of the rowing machine. The reason why was because with the body I had to use a bezier and I didn't know how to use it. So it took me a few attempts to do it but I finally got use to the tool and used it throughout my models.  Also the seat was hard to do as well because I had to use a freehand spline to create it.

If I was to improve my rowing machine I would add detail to the fan and make it look more attractive. But I think for a walkthrough my rowing machine is fine, you can fell what it is in detail. If I was to sell the product on I would then place a logo onto it and maybe a colour scheme as well.

Comparing the weights to the original  image I have tried to do it similar, but I wanted to change it slightly and make my gym walkthrough to have a bit of colour with it, so I colour co-ordinated the weights in order of weight. As you can see from the original image i have tried to do my own intake on my weights the reason for this is because I wanted it too look different. What I have done similar is the layout of the weights. The reason for this is because I thought it was simple but effective.

I think my weight equipment is very effective because it adds to the scene. It's something you would find at a gym with the weighing equipment. This is an effective product because the customer knows what it is and it makes the scene come more to life for the customer.

Personality from the rest of my 6 main models  I think this was one of the similar models to make because I didn't have to use the spline tool only the extrude tool which by this time at making the models I was quite use to using this tool. what I found the most difficult about this model was the weights. They were quite hard to do because I wanted them to look like they were actual weights. I then textured them and made them different sizes.

If I was to improve my model I would make it more like the original image, making the curves at the sides to make it more complex but the reason why I wanted to do it like this is so that you can see the texture of the weights, if I did my weights like the original image though you wouldn't be able to see the detail and it would blend into the background with the colourful ones you can tell by size and things. If i was to improve my model I would possibly make the grooves so that the weights fit into them the reason for this is to add a bit more detail to the product.

Comparing my water cooler and the original image mine is quite different in some respect, the reason for this is because I wanted to have a basic idea of what it looked like. What is similar to the original product is the taps and the water cooler bottle, I modelled them of the original image I did. I think my water cooler is different in a way because it's my own design. Instead of doing the base of the water cooler cylinder I decided to do it square, because I seen more water coolers when I was looking into it square rather than circular shape.

I think my water cooler is effective because it's something you would expect in a gym a water cooler. I thought it would set the part and like with the rest of the models it makes my gym what it is.  My water cooler is effective because  the original image wasn't done on cinema 4D so it was quite hard to make the image.

This model was quite hard to do especially the water cooler at the top the reason for this was because I wanted it too look like it had water inside it, so I had to use the lathe spline to get the water in the bottle. This was one of the trickiest things to do because I was unsure on how to do it. The other bits were quite straight forward like as you can see from my blogs the taps were quite hard but I used a extrude tool. One of the difficulties I had with this model and all my other models is working in a 3D perspective instead of looking at all angles of the object. I also found it difficult doing the inner bits on the water cooler as well because I had to use the knife tool, which was one of the first times I properly used it.

If I was to improve my water bottle I would maybe add a couple of stickers onto it to make it look more like a water bottle, and maybe make the texture look more shiny like the original image other than that I think I have done a good job on it especially with the water bottle itself.

This is my running machine which I made on the left, I have tried to go off the original image  but make the model look more modern. What I have tried to do is go on a basic and make my own touches to it. What I have done similar is the handles and the treadmill on the running machine, the reason for this is because I didn't know how I could do it so I proper had to look close. I also wanted my model to look like a running machine that's why I modelled it from this image.

What I thought was effective about my running machine was how much it looked like one and how modern it looks. If I was too look around the walk through gym I would know exactly what it was because it looks so much like the original model but with some of my own features to it. If I was to make my model into something I would sell I think it will be a good product because of the fact that it does look like one.

This model was one of the hardest to do because of the middle bit, that was really tricky because I needed to put a fillet on it but the sides kept on going wrong so I had to try a couple of ways until I got it right. Another thing I found hard was the screening because even though it was an extrude I had to make it with boxes to get the angle right as you can see it's on a slant. Other than them two things everything else I gotten use to through the other models.

If I was to improve this model I would possibly put a logo on the side of the band like the original image but I don't think it's necessary if it's just a walk through of the gym . Also to make it more like the original image I would make the buttons colourful and add holes for the drinks.


Monday 24 March 2014

Texturing In 3D Modelling

I have textured all of my models that I have made. The reason for this is because I think it makes the models come to life and makes them more realistic. It is quite simple to add textures onto the 3D models. The way I did it was I selected the part that I wanted texturing I then went on content browser and selected body paint and selected the materials I needed. To make the 3D modelling look real life, for example the paper in the file. What did was I went on materials at the bottom and clicked on file. I then went on new material and went to the box with attributes and went to colour, I then went down and clicked on texture I got an image of some lined paper off google images and saved the image. I selected the image and placed it on the object to make it more realistic.

Monday 17 March 2014

Virtual Camera- Final view around my gym


How I did a virtual camera view point was I firstly went on the free hand spline and went around the gym as a path of were I would want the camera to go. I then moved the spline down to make the spline level, like as though a person is walking around the gym. I then went on light object and clicked on a camera. To get the camera to follow the spline I had to click on the camera and went on tags which is on the bar above the camera and went down to align to spline. Once I clicked on that spline and moved it to the spline path which is on align to spline. I then clicked on the camera and clicked on tags and clicked on align to path.

Thursday 13 March 2014

8th Model - Weight Storage

 Firstly how I went on the cube object and clicked on the cube, I then made the shape editable and scaled it down to size. X=39m,Y=1062.5m and Z=49m. I then rotated it  H= -270 degrees and B=90 degrees.

I then copied and pasted the shape which I just made and put two on the bottom and and two on the top. But I put the back bars up a bit higher so that they were on an angle.
I then had to do the sides to get the pieces together. How I did them was I went on the cube object and made it editable similar to how I did the first shape. I then  scaled it down to size with the angles X=39,Y=205.5 and Z=49m. I then rotated it so that H=-270 degrees and P=-60.5. I then copied and pasted the cube and placed them at the end of the cubes.

 I then had to do the back of the base, and the foot to hold it together. Do do a cube object and made it editable and scaled it down. X=20.5,Y=409 and Z=26m. And rotated the shape to H=-270, P=6 and B=180.

To do the foot I  did the same. I got a cube from the cube object and made it editable. I then scaled the shape  to X=39,Y=205.5 and Z=28. I then had to rotate the object so that P=90 degrees and B=-270 degrees. I then copied and pasted the two objects and put them both on the opposite side.


To make the weight was quite simple I started off with a cylinder from the object tool and scaled it down to size. X=108.5,Y=94.5 and Z=33m. I then had to do the side of the weights. I did this by using a freehand spline and clicking on the n-side. Then I had to make it into a 3D object so I clicked on the Hypernurb and went on extrude. I then went on materials and added more weights and colour to make it look more realistic.

This is what my final piece looks like. As you can see I have added more weights to make the shelf look fuller and changed the sizes of them also.

Monday 10 March 2014

7th Model - Exercize Bike

First I started off by making a square by clicking on the object tool.  I then segmented the square to X=4, Y=1, Z=5 I did this by going on attributes and object and you should see segment. I then scaled it so that the x=411m1, Y=496m and Z=206. I then put a Hyper nurb onto the object and it should look like this.

I then  took off the hyper nurb and extruded the last square on the top to 20, you find extrude on structure tool on the bar. Then I went on the rotation tool and rotated it 70 degrees to make it look like this I had to do a few attempts to get the angle right.

I then grabbed the middle of the top of the square and extruded it out by 10 and then 5. I extruded this part for the seat that I will be making later. To make the TV on the exercise bike, I extruded it but what I found out after was that it went wrong on the side view so I had to undo it until I got to this bit and then I got a square and did the axis X=136M Y=8M and Z=95.5 . I found this was a lot better because I could move it about whereas when I put the hyper nurb on the object it looked deformed and unusual.
This is my second attempt at the TV part as you can see from the last image it looks miles better and looks more realistic. I then had to do the handles, the handles were alright to do I went on a new page and went on the free hand spline. I then sorted the points out so that they were straight on the 2D front image. I then went back on perceptive and use the soft interpolation, which is found on structure and then edit spline. I then got a circle off the free hand spline and placed a loft nurb onto it to create the bars.
To start off the first pedal I I had highlight the one of the faces the first one in and extruded it out a little bit to make it into a circular shape. This was quite easy to do because I knew how to extrude shapes out. I then got a cylinder and flattened it down and scaled it out.
I then made the pedal. I did this by highlighting the one of the faces and extruding it slightly. Because it had a hyper nurd on it, it made the extrude circular. I then went on the shape tool and got a cylinder. With the cylinder I made it editable and flattered it and scaled it down. To make the base of the pedal I got a square from the object tool and did 3 segments, I then made it editable and scaled it down.  lastly I selected the face tool and extruded it slightly I then used the bridge tool which is in structure which then grouped them together.

Final I then got a tube and scaled it down I then used the knife tool which is in structure to cut it in half. I then placed it were i wanted it to go. This part was a bit tricky because All the faces couldn't get picked and it kept deleting some of the faces when I wanted them extruding.


6th Model - Multi Gym

Firstly I started with the handlebar of the equipment I went on the free hand spline. I then sorted the points out so that they were straight on the 2D front image. I then went back on perceptive and use the soft interpolation, which is found on structure and then edit spline. I then got a circle off the free hand spline and placed a loft nurb onto it to create the bars. I then got a cylinder from from the cube object and and scaled it down to size X=52, Y=94 and Z=51. 

To do this part is quite tricky because there was some small pieces but it's fairly simple to do. Firstly I got a cylinder and made it editable. I then scaled it down to X=5,Y=481 and Z=5. After I did the first cylinder I then copied and pasted it and dragged it along the X axis. I then did the same again and a again to make it look something like this. To get the black circles I got another cylinder and and made it editable and scaled it down to X=63.5,Y=26.5 and Z=54. And like the other I copied and pasted them and put them into place. 

This is the first part of the multi gym. I did this part of the gym by copy and paste the first cylinder in the first image. I then got a cube from the cube object and made it editable. I then scaled it down toX=41.5,Y=35,Z=258.

To do the bench I got a cube from the cube object and fillet it in the attributes. I then made the shape editable and scaled the object down to X=168,Y=41.5 and Z=235. I then copied and pasted this and rotated the shape 90 degrees and scaled it to X=164,Y=44 and Z=405.5. To do the handles I simply copied and pasted the ones I did before and rotated the 90 degrees. 
To do the weights I stared off with a cube form the cube object and did a fillet in attributes. I then made the shape editable and scaled it down to X=110, Y=44 and Z=245.5. After I did this shape I then copied and pasted it 4 times and placed them one on top of each other by moving them on the Y axis. I then went onto the cube object and selected a cylinder and made that editable an scaled that down to X=68, Y=116.5 andZ=54 I then placed this on top of the weights for it to be a basis. To make the strings that pull the weight up I simply got a cylinder from the cube object and made it editable and scaled it down X=8, Y=631 and Z=8. I then copied and pasted them to make 3 to hold the weights together.
To do the press bar I firstly made a cube and made it editable and scaled it to X= 301,Y=152.5 and Z=22. I then made the bars to use as a base I again, got a cube from the cube object and made it editable I again scaled it down X=38 Y=33,and Z=639. and copied and pasted 4 of them and rotated them and placed them in the right position. 


This is the final piece of the multi gym. I am really pleased at how I did this I think its one of my better models. because I have gotten use to the software more.

5th model - File

To start my paper file I used the basis and did the holder which will hold the second file up. To do the holder I went on the cube object and clicked on cylinder and made it editable. To get the size of the shape the coordinates were X=5 ,Y=73 and Z=5. I then copied and pasted another 3 of them and put them into place.

To make the box I got a cube from the cube object and made it editable. I then scaled it  down to size with X=200,Y=66 and Z=287.5. To get the edge of the shape thicker I selected all the edges and scaled them to get that thickness. I then went onto the polygon tool and selected the top face and the front face and deleted them. I then went on materials and went on the red plastic and reduced the reflection of the colour so it looked more solid.

As you can see in this photo I have  added the objects which I have  created and placed them in the right places I then grouped the objects together so that they stayed in the same place.
After I grouped the objects, I selected the red tray, and copied and pasted it and used the Y axis to move the tray up so that it  rests onto the poles that I created at the start. To make the paper for the files I got a cube object from the tool bar and made it editable. I then scaled it down X=243 ,Y=1.6 and Z=174. I then went on materials and got a image of lined paper off the internet and went to colour and headed down to texture and uploaded the image I then placed the image onto the cube and copied and pasted it to make paper.


4th Model - Rowing Machine

Firstly I started off with a cylinder which I got off the cube object. I then made the cylinder editable so that I could scale it down to the size I wanted it to be which was X=32, Y=149 and Z=32. To get the side bigger what I did was copied a pasted the cylinder and scaled it down to X=34.5 ,Y=13 and Z=34.5. I then copied a pasted this cylinder and placed them on either end of the first cylinder.


I then hid the cylinders. I went on side view and used the bezier tool which is on the freehand spline tool. I firstly roughly drawn out the shape which would look like a rowing machine. I used 4 points for this shape. After I did a rough drawing of the base of the rowing machine, I then got a circle from the freehand spline tool and placed it to were the curve is on the shape. I then put the snaps on for the points and moved the round the circle to make the round curve. I then deleted the circle and got a base shape like this.


I then went back to the perceptive and clicked onto the spline. I then went onto the hypernurb object and clicked on the extrude nurb. What the extrude nurb does is it makes the 2D shape what you made into a 3d object. After I extruded the shape I then scaled it to the size I wanted it X= 56.5, Y=314.5, and Z= 423. I then went on the side and made my cylinders re-appear and put them in the right position.  I then grouped them all together.


After I did the base of the  rowing machine, I then added a segment on the top. I then got the polygon tool and selected one of the faces in the middle on the top. Then I clicked on structure and  bevel extruded tool and extruded it slightly, then I beveled it again and angled it. To make the foot pedals I used a cube  and fillet it to make it smooth and used segments X=3,Y=1 and Z=3.I then made the shape editable and scaled it down to size; X=37, Y=80 and Z=49. And rotated it sightly P=-25. To get the strap for the foot, I went on the polygon tool and clicked on the two end faces in the middle. I then went on structure and extruded the two faces together 3 cm. I clicked on the tops of the extrude faces and went on structure and clicked on bridge. I then went on materials and clicked on a black matt and copied and pasted the foot pedal to make another one for the other side.
To make the seat I went on the right side view and clicked on the freehand spline and clicked on bezier. Making the shape was quite tricky to do. When I was happy with my shape, I went back on the perceptive extruded the shape, like I did with the base of the rowing machine. To get the length of the bar I simply got a cube and made it editable and scaled it down to X=26, Y=26 and Z=726. I then copied the bar which I just created and scaled it down again to make the end stopper as you can see in the photo. I scaled it down X=27.5, Y=31, and Z=15. To make the base of what the seat sits on, I copied and pasted the end stopper and scaled to make it bigger, X=40, Y=33 and Z=60. To get the hole to make the seat move, I went on the polygon tool and selected the end faces and deleted them and grouped the seat and the holder together. To make the base to what it holds I copied and pasted the one I did before for the base of the rowing machine.

To make the screen I simply  went on the cube object and scaled it to size X=67, Y=84.5 and Z=11, I then placed it onto the extruded part which we did before. I then got a image off the internet of a screen on an exercise machine and went on materials on cinema 4D. I then clicked on colour and went to texture and opened the picture I selected. I then placed the image onto the square.

3rd model - Water Cooler

Firstly I got a cylinder from the cube object tool, I then made the object editable, I then clicked on the scale tool to x=150, y=223,z=160. I then had to smoothen the top and bottom faces. I did this by going onto structure and clicking on edit spline and going on soft interpolation. To get the rings in the water cooler, I clicked on faces and clicked on the middle face, i then grabbed the knife tool which is in structure, and knifed two parts of the water cooler. I then did the same again underneath, then again at the bottom as you can see in the photo. After I did this I extruded the shape by going onto structure. I extruded it in to create the water cooler effect. To get the blue effect I went on materials and clicked on the blue plastic and lowered the reflection.


To get the base of the water cooler I had to get a cube from the object tool, and put 4 segments into the x axis and 4 for the Y axis. I then went on the polygon tool and clicked on the four faces in the middle on the front of the cube. I then went on the structure on the bar tool and went on extrude. I then extruded the faces in to make the inside of the water cooler for the taps. I then placed the water cooler which I did      . To make it come together.

How I did the taps were quite simple. I firstly got a cylinder from the cube object and added segments having 8 segments on the x axis and 3 on the y axis. I then scaled it down to x=16, y=31.5, z=22. I went on the polygon tool and selected the 2 faces at the bottom. I then went on structure and extruded the bottom 2 cm. I then copied and pasted the tap and went on the materials and went on red plastic and blue plastic and made the colour solid.

2nd model Running Matchine

I started off by getting a cube from the shape tool and making it into editable. I  scaled the cube to make it into a rectangle to make it the base of the treadmill. I went on the face selection tool and selected the outer faces as you can see on the picture I am selecting the faces. once I selected the face I then went on structure and extruded it. I rendered it to make sure it looked right.


After I did the extruding on the base of the treadmill,I grabbed the back four faces with he face tool and extruded them to 30 and scaled them to size, after that I use the Z axis to rotate it 50 degrees. I then did this for the other size as well to make them even. To get the middle bit I grabbed the faces with the face tool and extruded it up and used the z axis to give it the angle. I made it level with the two sides.
Firstly get a cube and make it fillet by going on attributes and clicking on it this smooths the edges of the cube. Then I scaled it down to size by making it editable I used the face tool for on of the side faces and clicked and extruded it to the size that goes with the treadmill.
After I did the handles I grabbed the face on top and extruded it 20cm and but an angle on it to make it look like a screen because this just as a square didn't look right.


To make the face of the screen I used another cube and put a fillet on it to give the cube smooth edges like a screen. I then had to scale it down and rotate it to give it that shape.To make the button for underneath the screen I used a cylinder and scaled it down dramatically so that they will fit under the screen.
This is my final piece of my running treadmill. I added some materials to make it come to life a bit. I used a dark grey matt for the structure of the treadmill. I got these from the content browser tool on the bar. I then used the same matt but turned it black for the belt, screen and buttons.


Monday 10 February 2014

Cinema 4D - Activity 1 Holes


 Firstly I got a cogwheel out of the free hand spline tool and then got a circle and scaled it so that the circle was smaller than the cogwheel. I then made the spline editable by going on the object menu.


I then created a extrude NURBS object, and dropped in both  splines to get an extrude of that shape. I then connected the two spline and dropped the new connected outlines to the Nurbs object . It then makes a hole.
This is what the final piece of the hole cogwheel looks like. As you can see there is a hole in the centre of the object.